How to make the colorful pop rings at home
The perfect accessory for this spring, 100% handmade
G-Club
March 27th, 2021
March 27th, 2021
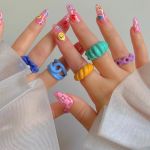
We are again in lockdown and locked in house, we have to find something to creative and fun to do; even better if the result can be something useful and cool. The days of school are gone, but I bet everyone at least once found has been playing with the modeling clay, which you brought home and then forgot in a drawer. Now you can find it in all colors, fluo or pastel, with or without glitter, and you can create everything from jewelry to the most bizarre applications. These days on the web there have been photos of stars, models and influencers with colorful and large rings, perfect for the spring season, are the pop rings (or juicy rings, literally succulent rings). We have already talked about them here (link) but now let's go back to the 90s and see how to replicate them at home.


In the experiment we used a FIMO modeling clay, with a soft touch, which hardens in the oven. If you already have it at home but haven't used it for a long time, don't throw it away, reuse it.
If it has crumbled, add a few drops of warm water and start working it with great patience, trying to compact it as much as possible. If it has become too hard, let it warm up a little in the sunlight, it will soften naturally. There are many designers and bijoux brands that have proposed them in the most particular colors and style; check out these examples to find the Pop Rings you like best and replicate it at home.
What you need
Modeling clay, polish, brush, cutter.


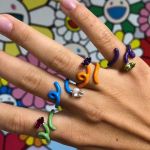
MODEL 1 (pop snake)
Take the modeling clay and create a sort of long snake, rolling it with your hands. Arrived at a length of about 20cm, help yourself with a circular object (for example a maxi marker) to recreate the circumference of your finger. Gently place the snake on the felt-tip pen, giving it a wavy movement.
MODEL 2 (braid)
Take the modeling clay of 2 different colors and form 2 different snakes as long as the circumference of your finger. Cross the 2 snakes, forming an intertwining pattern. Then wrap it on your finger; if you need it, use a maxi pannarello to recreate the circumference.
MODEL 3 (mix)
Take the modeling clay of 2 different colors and mix them together. When the colors have created nice shades on the surface, roll it in your hands, creating a snake as long as the circumference of your finger. You can choose the height of the ring yourself. Wrap the snake around your finger; if you need it, use a maxi pen to recreate the circumference.
MODEL 4 (wavy)
Take the modeling clay and form a snake as long as the circumference of your finger. Shape it into waves and decorate it with beads or small diamonds. Then wrap it on your finger; if you need it, use a maxi pannarello to recreate the circumference.
MODEL 5 (spiral)
Take the modeling clay and form a snake as long as the circumference of your finger. Model it by creating interwoven squiggles, which rise in height and "climb" on the finger. Then wrap it on your finger; if you need it, use a maxi pen to recreate the circumference.
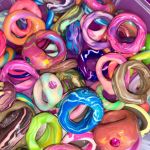
* FOR ALL THE RINGS: Once the rings have been shaped, gently peel them off and place them on a baking sheet, ready to go in the oven. Cook them on a low temperature for 30 minutes. Once hardened pass the polish with a brush, let it dry, and wear them.